Wednesday, October 25, 2006

Painting A Day - "Sunset on Half Dome"


This is my "Painting A Day" - number 2. It is watercolor on 140 lb watercolor paper. 5x7 inches. I'm surprised I finished one on a Wednesday. Today is the day I go to volunteer in my son's class. Fifth year of doing that, every Wednesday. I usually don't get a lot of art done on these days. I'm usually pretty tired after helping in the class. I love the kids, but they really can be mentally draining! But I'm breaking old patterns and doing art in spite of being drained. Yay!!

I thought I would do a vacation-inspired painting on this day. I've done many Half Dome paintings in my travel journals. It's a tradition for Wesley and I to do at least one Half Dome rendering at sunset. So I used this year's journal entry and a photo we took as inspiration for this little painting. Yosemite is such an extraordinary place. I often wonder how so much beauty can be in one place.

I'm offering this painting for sale on eBay - $9.00 opening bid. See the link to the right. Thanks!

Tuesday, October 24, 2006

Painting A Day - "Peak-A-Boo"

This is my first "Painting A Day!" Oh, the pressure! Can I do it?! We'll see how many days I can go before I don't get a painting done in a day. I know, it's only a general committment - just to be more productive in general with my art. Knowing me, I'll have to go out of town soon, then I won't get 1 done a day. I will try to doodle for some ideas though.

This little watercolor painting is an ACEO - 2.5 x 3.5 inches. I decided to start extra small. I'm still in my ACEO phase. One reason I love ACEOs is because of the easy shipping. Wouldn't anyone?

I did a doodle of this little cat hiding in a pumpkin one Wednesday while at Wesley's school. So I decided to make it into a painting, and make it my first Painting A Day. For me the hard part of doing a painting a day will be coming up with ideas. I guess I need to get past that. The important thing is just to paint, to improve my techniques. But I always feel like my imagination needs to excercise as well. We shall see if my creative well will run dry or not!!

Oh, this is for sale now at eBay. See the link to the right>>>. And as usual, a low starting bid of only $.99!! Also, check out the link to the Daily Painters Gallery. There is some beautiful art there!

Friday, October 20, 2006

October NibbleFest

Time for NibbleFest! This is my entry in October NibbleFest - which the theme this month is "Gnarled Trees". On the 20th of each month there is a NibbleFest Art Contest on eBay. The winner is the person with the most unique bidders - meaning each bidder is counted once, no matter how many bids they put in.

I like NibbleFest. Wesley has participated more than I have though. I love the variety of work that comes out of these contests. Plus, I love anything that gets my imagination moving. The extra exposure to my auctions is also always a good thing!

This gnarled tree is an ACEO (2.5x3.5") done in watercolor. She's kind of a tree faery, I guess. I'm happy with how she came out, and at the last minute, as usual!

Thursday, October 19, 2006

Art Lesson - Owl Collage

Today I got back in to the swing of things with a private lesson. I hadn't done a private lesson since June. Busy summer, busy fall! This lesson was with a second grader. I've been doing lessons with this little one for almost 2 years now. This little girl has more focus than most kids, so a lot of complicated lessons can be done with her.

This lesson is a collage of an owl with decorative papers. I saw a beautiful, detailed owl done in a 3-D collage effect on the internet. So I was inspired to make an art lesson like it - like a lot of art I see. I'm always trying to think of new art lessons. I tried to have her see the darks and lights in an owl, then use the colorful, patterned papers in the same way. We cut the paper into "feather-like" shapes. This was where I had to help her the most - because we had to be done in an hour. She glued them on to her owl that she had first drawn. I had her start at the bottom and overlap to the top. I also folded the feathers a little to add a little 3D effect. Then the round eyes, beak, and branch were added. There could've been a little more contrast below the beak to make it show up better. But that's pretty minor. I think it turned out pretty cute and whimsical! Easy for a one-on-one class, but may be too complicated, and expensive for a large class. Any bird could be made the same way. And I think an imaginative, fantasy bird would be really fun.

Wednesday, October 18, 2006

Wesley's New Skull ACEO


Wesley is getting busy with his art again. This is yet another of his terrifically creepy skulls. This is "Voodoo Skull". He really enjoys making ACEOs. And I think he's very good at thinking of new, crazy ideas. Wesley really does have a prolific imagination. I wish I could tap into it! This card is for sale now on ebay - find the link on the right and it should bring you to it. Half of his profits go to his college fund. He's such an intelligent person that he must go to college. I hope I can afford it when the time comes. I'll just have to make it happen somehow.

Another new thing in Wesley's life is that he's now playing the trumpet. A good thing about fourth grade is you get to learn an instrument at school. Luckily, that wonderful thing hasn't been cut from our school - yet! American schools are so skrewed up now. We have to have an art program completely funded and run by volunteers. And we are one of the lucky schools that has the ability to do this. Most kids don't get any art. It is so sad. I could have an entire blog on the subject of education in our country, but I think I'll stop here for now!

Sunday, October 15, 2006

Frankenstein on LP


I finished this last night. It's another painting on a record. I guess I'm thinking a lot about Halloween lately. One of the coolest monsters is Frankenstein. I once did a drawing of Frankenstein's Bride way back when I was in high school. I think I still have it. I'll have to find it to show Wesley that I have done some monster art myself. I think when I did it I was just liking the fact that she was an old movie character. Although I had an interest in fantasy back then too.

I've put a gloss varnish on one of my records, but this time I used matte finish. I guess it's a personal preference of which to like more. It seemed to me that Frankenstein should be matte, not all shiny-like. The glossy one does look good to me. But the record with gloss is a pop girl blowing stars, or snowflakes. So she definately needed a glossy finish.

-SOLD-

Friday, October 13, 2006

Pattern Cats Art Lesson


I had a pretty successful art lesson today with 20 second and third graders. We did pattern cats. In an earlier post you may have seen the "pattern turtles" that I've done with younger kids. This is basically the same lesson except with cats. I needed to change it a bit since 2 years ago I had already done the cats with 2 or 3 of the kids. So we used oil pastels and watercolor instead of the usual markers. I really like the outcome with the paint instead of markers. It also shows them how resists work since you can paint right over the oil pastels and keep the colors intact.

I started doing these cats 2 years ago and it is a pretty big hit so I'm continuing to do them. This group of kids seemed to want to put scars on their cat's faces. When Wesley's group did this 2 years ago, flames were all the rage. Of course, it's the boys that go off on these crazy ideas. There were also "Terminator Cats". And the girls always want to put hearts all over theirs.

First, I do the simple directed cat drawing with them - they are to use pencil. There's always a few who aren't happy with theirs and need to erase. Then they outline in black oil pastel. I then showed them how to section off the cat a bit, and talked about the patterns. You have to make sure to say "designs" more than patterns, because the math curriculum talks a lot about patterns and the kids think about "AB" patterns, etc. Then they fill with some designs - stripes, dots, swirls, etc. They should be told not to color in completely with the pastels since there is always at least one that will do this. Finally, they were to paint with watercolor. I tried to emphasize using different colors because we wanted to make very imaginative, colorful cats. There is usually at least one who wants to do a realistic cat. They don't want to do these cats you might see in a dream. I think it's good for them to stretch the imagination. And they can also see that not all art is just like real life.

So this was a successful day... no tears, no frustrations, little help from me. And I was playfully called "King Kong" by one little energetic, wild, second grade boy. Is that a compliment?!

Tuesday, October 03, 2006

Aggie's ready for Halloween


Wow, I can't believe I finished Aggie in less than a week! That's good for me since I usually let dolls that I'm making sit around a while before they are finished. I must've enjoyed making this cute witch.

The most time consuming part of sewing something is the picking of the fabric. I have a large collection of assorted fabrics. Recycled, vintage, new. I just love fabric! So once I've got an idea of which I'm going to use it goes much faster. I didn't use a pattern. That's how I usually make a doll. Just figure it out as it comes. I dyed the muslin body in tea. Sewed some wool yarn into her head. Stuffed her, drew and painted her face. Then the next hard part is making her clothes. Aggie has a blouse that is a lot like a corset, some bloomers, a mini skirt, and of course a hat. All are removable so she can change her clothes if wanted.

Aggie really would like to be a creeepy, scarey kind of witch but she doesn't have it in her. She's just too darn cute!

Monday, October 02, 2006

Tissue Paper Collage Lesson


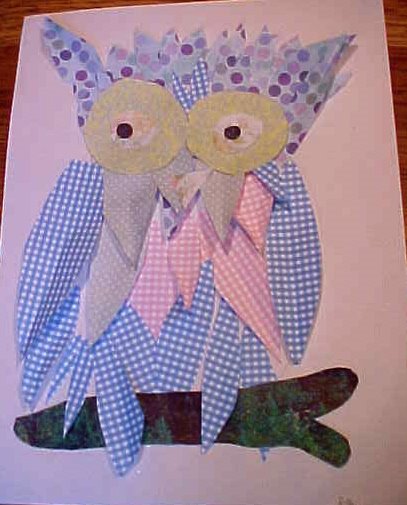
Last friday I did an art lesson with a class of 28 fourth graders. The lesson was using tissue paper in a collage. I had done this lesson before a couple of times with one or two kids. It was a lot harder with the large class.

First, I talked with them about sillouettes. I don't think they all understood just what a sillouette is. I gave a quick run through of just how the whole project was done, while also showing some examples. I only had an hour to have them do this project from start to finish and I knew this project took some time. I felt I really had to get my lecture finished quick so they would have time to finish. I don't like that stress and I felt rushed. Because of that I feel I really didn't explain as good as I could've.

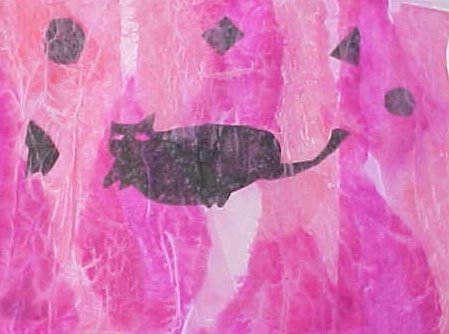
First I had them draw what I wanted to be a simple silouette on black tissue paper. There were some that did just that. There were also some that didn't get it and drew quite detailed little drawings. Much too detailed to cut out. Flaw number 1 on my part. You really need to emphasize to do a SIMPLE outline, and make it pretty large. Not something the size of a quarter! Some needed me to help with their drawing mainly to draw a dolphin or spider which were both ideas I had shown them. If I drew the thing for them I tried to have them draw a little something to go with it. So that it wasn't ALL my drawing.

Then I had them paint a watered down glue mixture onto the paper, and place the black design onto the glue. I had them paint gently on top of the black design. When they were done with that I had them choose 3 colors of tissue. At first I thought it would be best to use only 3 colors, each like eachother. In otherwords no contrasting colors. But many didn't listen to that, and in the end it didn't matter. I guess I was thinking it would make the whole piece too chaotic, and the sillouette might get lost. That wasn't a prob since we only used lighter shades of tissue to put over the black. Next time I will strike the mention of what colors for them to choose. Just keep it to 2 or 3 colors plus black.

Then they were to start making these into strips and gluing. Again having them glue onto the background first - not directly onto the tissue. I think most are used to putting glue on to the small paper, not the background, and they forgot that sometimes. It's also a good idea to mention to try to keep one hand clean of glue. I don't know if many can do this though! Most kids I don't think care about the sticky stuff, but some can get a little frustrated.

Some kids were really able to do the whole thing with no help. Some needed my help from the beginning. I had 5 different sillouette ideas, but some wanted to do there own design. I want to encourage their own ideas always, but it seems the kids that had the hardest time were the ones that had their own ideas. Because the silouette can be hard to make look like you want it, without all the details. This project would probably work better with a little older children - maybe 5th, 6th or 7th grade would be best. I was a very busy helping draw, cut, strip, and sometimes helping glue strips at the end because of the time restraints. It was just so mucher harder because of the amount of kids this time too. Oh well you live and learn.